Pages

Showing posts with label MongoDB. Show all posts

Monday, November 26, 2018

MongoDb Atlas in Azure vs Azure CosmosDb

Intro

At the beginning of our developing on one of my projects we planned that we will use Azure CosmosDB for Mongo database hosting. Mainly we chose Cosmos because it is easy to set up, good features like autoscaling, autoindexing, SLA, and we can work with it as with black box without any big expertise in that technology. But during the development process, we have found some disadvantages for us. Two main limitations for us:
  1. CosmosDB does not support API version of MongoDB greater than 3.4. We could not use many important Mongo features like transactions, schema validations etc.
  2. There is no normal CosmosDB emulator for local dev environment.

Description

MongoDB Atlas is a fully-managed cloud database developed by the same people that build MongoDB. Atlas handles all the complexity of deploying, managing, and healing your deployments on the cloud service provider of your choice (AWS, Azure, and GCP). Follow the links below to get started.

Main advantages and disadvantages

Fully MongoDB API version support
We confidently can work with a local MongoDB database on dev environments.

We should choose between sharded cluster and replica set. Also, we should deal with Global Clusters and Global Write Zones and Zone Mapping.
Anyway, we should have more expertise in MongoDB.

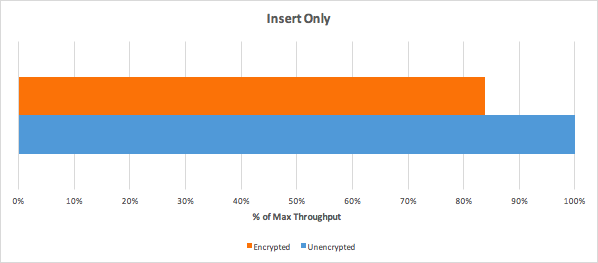
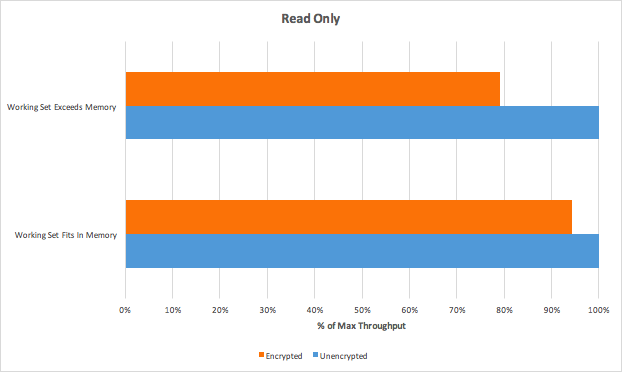
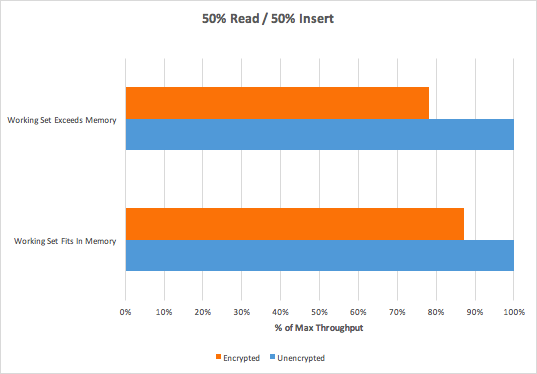
Comparison with CosmosDB

MongoDB Connector for BI

The MongoDB Connector for Business Intelligence (BI) allows users to create queries with SQL and visualize, graph, and report on their MongoDB Enterprise data using existing relational business intelligence tools such as TableauMicroStrategy, and Qlik.
The MongoDB Connector for BI acts as a layer that translates queries and data between a mongod ormongos instance and your reporting tool. The BI Connector stores no data, and purely serves to bridge your MongoDB cluster with business intelligence tools.


User Authentication and Authorization with LDAP - Connect to your clusters via LDAP / Active Directory

Connect via BI Connector for Atlas 

Database Auditing - Audit activity on your database

MongoDB Stitch - Create a serverless application

MongoDB Charts - Visualize data in MongoDB

Cluster Tier selection

Select your preferred cluster instance size. The selected instance size dictates the memory, storage, and IOPS specification for each data-bearing server [1] in the cluster.
Atlas categorizes the instance sizes into tiers as follows:

Shared Clusters

Sandbox replica set clusters for getting started with MongoDB. These instances deploy to a shared environment with access to a subset of Atlas features and functionality. For complete documentation on shared cluster limits and restrictions, see Atlas M0 (Free Tier), M2, and M5 Limitations.

Dedicated Development Clusters

Instances that support development environments and low-traffic applications.
These instances support replica set deployments only, but otherwise, provide full access to Atlas features and functionality.

Dedicated Production Clusters

Instances that support production environments with high traffic applications and large datasets.
These instances support replica set and sharded cluster deployments with full access to Atlas features and functionality.
The following table highlights key differences between an M0 Free Tier cluster, an M2 or M5 shared starter cluster, and an M10+ dedicated cluster.


Atlas M0 (Free Tier), M2, and M5 Limitations

Maximum of 100 operations per second allowed for M0 Free Tier and M2/M5 shared clusters.
M0 Free Tier and M2/M5 shared clusters are allowed a maximum of 100 connections.
M0/M2/M5 clusters limit the total data transferred into or out of the cluster as follows:
  • M0: 10 GB per week
  • M2: 20 GB per week
  • M5: 50 GB per week
Atlas throttles the network speed of clusters which exceed the posted limits.
M0 Free Tier and M2/M5 shared clusters have a maximum of 100 databases and 500 collections total.

Global Clusters

Atlas Global Clusters uses a highly curated implementation of sharded cluster zones to support location-aware read and write operations for globally distributed application instances and clients. Global Clusters support deployment patterns such as:
  • Low-latency read and write operations for globally distributed clients.
  • Uptime protection during partial or full regional outages.
  • Location-aware data storage in specific geographic regions.

How does MongoDB Atlas deliver high availability?

Billing

Deploying clusters onto Microsoft Azure

All MongoDB docs: https://docs.mongodb.com/
MongoDB Connector for BI docs: https://docs.mongodb.com/bi-connector/current/

Tuesday, January 30, 2018

Introduction to MongoDB Aggregation Pipeline

The main goal of this document is to describe the most commonly used commands of the aggregation pipeline and also give some recommendations for aggregation requests implementation. There will be also a sample solution for C# environment at the end of the document.

Quick Reference

$match

Filters the documents to pass only the documents that match the specified condition(s) to the next pipeline stage.
{ $match: { <query> } }

$project

Passes along the documents with the requested fields to the next stage in the pipeline. The specified fields can be existing fields from the input documents or newly computed fields.
{ $project: { <specification(s)> } }
Specifications can be the following:
<field>: <1or true>Specifies the inclusion of a field.
_id: <0 orfalse>Specifies the suppression of the _id field.
<field>:<expression>Adds a new field or resets the value of an existing field.
<field>:<0or false>
Specifies the exclusion of a field.

$sort

Sorts all input documents and returns them to the pipeline in sorted order.
{ $sort: { <field1>: <sort order>, <field2>: <sort order> ... } }
Sort order can be the following values:
  • 1 to specify ascending order.
  • -1 to specify descending order.

$lookup

Performs a left outer join to an unsharded collection in the same database to filter in documents from the “joined” collection for processing. To each input document, the $lookup stage adds a new array field whose elements are the matching documents from the “joined” collection. The $lookup stage passes these reshaped documents to the next stage.
{
    $lookup:
    {
        from: <collection to join>,
        localField: <field from the input documents>,
        foreignField: <field from the documents of the "from" collection>,
        as: <output array field>
    }
}

Aggregation Pipeline Optimization

All optimizations here have their target to minimize the amount of data that are sent between pipeline stages. Also, these optimizations are done automatically by MongoDB engine, but it will probably be the right decision to eliminate at least partly the need for such optimizations to make DB engine work a bit faster.
All optimizations are done in two phases: sequence optimization and coalescence optimization. As a result, long chains of aggregation phases sometimes can be transformed into a lesser number of phases that require less memory.

Pipeline Sequence Optimization

$project or $addFields + $match

If $match follows $project or $addFields, then that expressions from match stage that doesn't need to be computed in projection stage are moved before projection stage.

$sort + $match

In this case $match is moved before $sort to minimize number of items to sort.

$redact + $match

If $redact stays before $match, then sometimes we can add portion of $match statement before $redact to limit number of documents aggregated.

$skip + $limit

During optimization $limit is moved before $skip, and the $limit value is increased by $skip amount.

$project + $skip or $limit

Obviously, in this case $skip or $limit goes before $project to limit number of documents to be projected.

Pipeline Coalescence Optimization

When possible, the optimization phase coalesces a pipeline stage into its predecessor. Generally, coalescence occurs after any sequence reordering optimization.

$sort + $limit

When a $sort immediately precedes a $limit, the optimizer can coalesce the $limit into the $sort. This allows the sort operation to only maintain the top n results as it progresses, where n is the specified limit, and MongoDB only needs to store n items in memory.

$limit + $limit

When a $limit immediately follows another $limit, the two stages can coalesce into a single $limit where the limit amount is the smaller of the two initial limit amounts.

$skip + $skip

When $skip immediately follows another $skip, the two stages can coalesce into a single $skip where the skip amount is the sum of the two initial skip amounts.

$match + $match

When a $match immediately follows another $match, the two stages can coalesce into a single $match combining the conditions with an $and.

$lookup + $unwind

When a $unwind immediately follows another $lookup, and the $unwind operates on the as a field of the $lookup, the optimizer can coalesce the $unwind into the $lookup stage. This avoids creating large intermediate documents.

Aggregation Pipeline Limits

Each document in the result set is limited by the maximum size of BSON Document, it's currently 16 megabytes. If any single document exceeds this limit, the 'aggregate' command will produce an error. The limit only applies to the returned documents; during the pipeline processing, the documents may exceed this size.
Pipeline stages have a limit of 100 megabytes of RAM. If a stage exceeds this limit, MongoDB will produce an error. To allow for the handling of large datasets, use the allowDiskUse option to enable aggregation pipeline stages to write data to temporary files.
The $graphLookup stage must stay within the 100 megabyte memory limit. If allowDiskUse: true is specified for the aggregate operation, the $graphLookup stage ignores the option. If there are other stages in the aggregate operation, allowDiskUse: true option will affect these other stages.

Aggregation Pipeline and Sharded Collections

The aggregation pipeline supports operations on sharded collections.

Behavior

If the pipeline starts with an exact $match on a shared key, the entire pipeline runs on the matching shard only. Previously, the pipeline would have been split, and the work of merging it would have to be done on the primary shard.
For aggregation operations that must run on multiple shards, if the operations do not require running on the database’s primary shard, these operations will route the results to a random shard to merge the results to avoid overloading the primary shard for that database. The $out stage and the $lookup stage require running on the database’s primary shard.

Optimization

When splitting the aggregation pipeline into two parts, the pipeline is split to ensure that the shards perform as many stages as possible with consideration for optimization.
To see how the pipeline was split, include the explain option in the db.collection.aggregate() method.
Optimizations are subject to change between releases.

Time measure experiment

For this experiment I used following data:
100 000 records for Users
100 000 records for Items
1 000 000 records for Orders, that contain user id and can contain up to 10 items ids.
Experiment was done with four tests: simple match, match using collection 'contains' function, lookup with match, and lookup & match & unwind & group.
Also time has been measured for following cases: when foreign key was object id with ascending index and hash index, and when foreign key was GUID with ascending index and hash index.
I've got following results:

ObjectId & Ascending Index
ObjectId & Hash Index
GUID & Ascending Index
GUID & Hash Index
Ascending GUID & Ascending Index
Ascending GUID & Hash Index
CombGUID & Ascending Index
CombGUID & Hash Index
Non-ID without Index
Non-ID & Hash
simple match0.168s0.168s0.171s0.18s0.183s0.179s0.185s0.183s0.194s0.177s
match with 'contains'0.709s0.722s0.814s0.83s0.793s0.828s0.798s0.787s0.79s0.781s
lookup & match66.373s79.796s79.823s97.733s83.317s97.171s85.767s98.76s42501.798s ≈ 11h 48m 21.798s83.502s
lookup & unwind & match & unwind & group75.856s74.563s81.012s86.546s84.847s86.375s86.045s85.928s44605.215s ≈ 12h 23m 25.215s82.692s
lookup & unwind & match & unwind & lookup & unwind & group73.797s74.129s83.504s87.338s85.418s86.321s86.303s86.572s44763.693s  12h 26m 03.693s82.749s
Results are pretty bad, as we can see. But, there is a way to do it right!
This measurements were done by using aggregation pipeline on Orders, that was lookup-ed with Users and filtered on username AFTER that. But what if we use aggregation pipeline on Users, filter it on username and do a lookup with Orders collection. The results I've got are following:
simple match0.187s
match with 'contains'0.807s
lookup & match0.062s
lookup & unwind & match & unwind & group0.038s
lookup & unwind & match & unwind & lookup & unwind & group0.014s
So, as we can see, now we have a very good request speed with aggregation pipeline. So, we should think very carefully about optimizations while using the aggregation pipeline.
Also I did tests on the same tasks but without aggregation pipeline usage. The results are following:
simple match0.008s
match with 'contains'0.012s
lookup & match0.566s
lookup & unwind & match & unwind & group0.652s
lookup & unwind & match & unwind & lookup & unwind & group0.838s
Of course, these tests were done without such things as indexes, etc. That's why they are executed for a bit longer.

Thursday, December 21, 2017

How-to: Make MongoDB HIPAA compliant

Configuring encryption at rest

To enable encryption in MongoDB you should start mongod with --enableEncryption option.
Also, you need to decide where you are going to store the master key. You can store it either in external key manager which is the recommended way since this is necessary to meet HIPAA guidelines, or locally.
You will need to get an external key manager application that supports KMIP communication protocol. For example, this: https://www.townsendsecurity.com/products/centralized-encryption-key-management

To start mongodb with the new key use this command:
mongod --enableEncryption --kmipServerName <KMIP Server HostName> --kmipPort <KMIP server port> --kmipServerCAFile <ca file path> --kmipClientCertificateFile <certificate file path>
Now about the two last options:
--kmipServerCAFile <string>
Path to CA File. Used for validating secure client connection to KMIP server.
--kmipClientCertificateFile <string>
A string containing the path to the client certificate used for authenticating MongoDB to the KMIP server.

If the command succeeds then in the log file you will see the following messages:
[initandlisten] Created KMIP key with id: <UID>
[initandlisten] Encryption key manager initialized using master key with id: <UID>
If a key already exists, then use the following command to start mongodb:
mongod --enableEncryption --kmipServerName <KMIP Server HostName> --kmipPort <KMIP server port> --kmipServerCAFile <ca file path> --kmipClientCertificateFile <certificate file path> --kmipKeyIdentifier <UID>
To read the full article about mongodb encryption at rest, follow this link: https://docs.mongodb.com/manual/core/security-encryption-at-rest/

Transport encryption

On server side

Before you can use SSL, you must have a .pem file containing a public key certificate and its associated private key.
MongoDB can use any valid SSL certificate issued by a certificate authority, or a self-signed certificate. If you use a self-signed certificate, although the communications channel will be encrypted, there will be no validation of server identity.

Set Up mongod with SSL Certificate and Key

To use SSL in your MongoDB deployment, start mongod including following run-time options:
  • net.ssl.mode set to requireSSL. This setting restricts each server to use only SSL encrypted connections. You can also specify either the value allowSSL or preferSSL to set up the use of mixed SSL modes on a port.
  • PEMKeyfile with the .pem file that contains the SSL certificate and key.
Syntax should be following:
mongod --sslMode requireSSL --sslPEMKeyFile <pem> <additional options>
You may also specify these options in the configuration file, as in the following example:
net:
    ssl:
        mode: requireSSL
        PEMKeyFile: /etc/ssl/mongodb.pem

Set Up mongod with Certificate Validation

Along with options from the previous methods you should also set up CAFile with the name of the .pem file that contains the root certificate chain from the Certificate Authority.
Syntax:
mongod --sslMode requireSSL --sslPEMKeyFile <pem> --sslCAFile <ca> <additional options>
If you prefer using a configuration file, then:
net:
    ssl:
        mode: requireSSL
        PEMKeyFile: /etc/ssl/mongodb.pem
        CAFile: /etc/ssl/ca.pem

Disallow Protocols

To prevent MongoDB servers from accepting incoming connections that use specific protocols, including the --sslDisabledProtocols option, or if using the configuration file the net.ssl.disabledProtocols setting.
mongod --sslMode requireSSL --sslDisabledProtocols TLS1_0,TLS1_1 --sslPEMKeyFile /etc/ssl/mongodb.pem --sslCAFile /etc/ssl/ca.pem <additional options>
If you use config file:
net:
    ssl:
        mode: requireSSL
        PEMKeyFile: /etc/ssl/mongodb.pem
        CAFile: /etc/ssl/ca.pem
        disabledProtocols: TLS1_0,TLS1_1

SSL Certificate Passphrase

The PEM files for PEMKeyfile and ClusterFile may be encrypted. With encrypted PEM files, you must specify the passphrase at startup with a command-line or a configuration file option or enter the passphrase when prompted. To specify the passphrase in clear text on the command line or in a configuration file, use the PEMKeyPassword and/or the ClusterPassword option.

On client side

For C#:
To read a full article about mongodb transport encryption, follow this link: https://docs.mongodb.com/manual/core/security-transport-encryption/

Performance (of encryption at rest)

CPU: 3.06GHz Intel Xeon Westmere(X5675-Hexcore)
RAM: 6x16GB Kingston 16GB DDR3 2Rx4
OS: Ubuntu 14.04-64
Network Card: SuperMicro AOC-STGN-i2S
Motherboard: SuperMicro X8DTN+_R2
Document Size: 1KB
Workload: YCSB
Version: MongoDB 3.2
In such environment they've got following results:
In addition to throughput, latency is also a critical component of encryption overhead. From our benchmark, average latency overheads ranged between 6% to 30%. Though average latency overhead was slightly higher than throughput overhead, latencies were still very low—all under 1ms.

Average Latency (µs)
Unencrypted
Encrypted
% Overhead
Insert OnlyAverage Latency32.440.9-26.5%
Read Only
Working Set Fits In
Memory Avg Latency
230.5245.0-6.3%
Read Only
Working Set Exceeds
Memory Avg Latency
447.0565.8-26.6%
50% Insert / 50% Read
Working Set Fits In
Memory Avg Latency
276.1317.4-15.0%
50% Insert / 50% Read
Working Set Exceeds
Memory Avg Latency
722.3936.5-29.7